Make Your LoggerNet Data Collection More Flexible
by Dana Worley | 更新日: 06/03/2015 | コメント: 0
If you are a user of our LoggerNet software, you know that the software can be configured to collect data from your data logger on a regular interval. From a data logger's Schedule tab in the Setup Screen, you can configure an interval of anywhere from a few seconds to a few days by setting the desired value in the Collection Interval field.
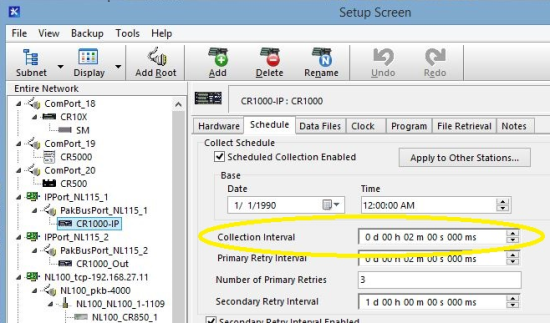
But what if you have a need to collect data on a varying schedule? Over the years, we've heard requests to support scenarios where, for instance, you want to collect data hourly during the workweek, but don't need to collect data on evenings or weekends.
Calendar-Based Scheduling
Beginning with version 4.2, LoggerNet's Task Master supports calendar-based scheduling. Calendar-based scheduling lets you set specific minutes of the hour, hours of the day, days of the week, days of the month, or months of the year when you want a specific task to be executed. While the Task Master is quite often used for executing batch files, command line operations, or executables, you can also use it to collect data from a data logger.
When you couple LoggerNet's normal data collection schedule with the Task Master's calendar-based scheduling, you end up with a very flexible tool for scheduled data collection.
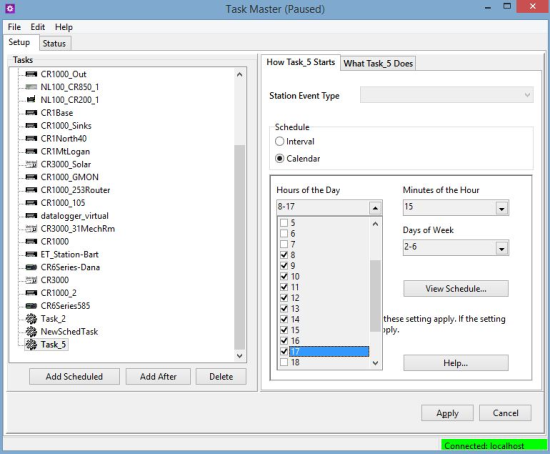
Here's an example of how to set up an hourly data collection schedule, Monday through Friday. I've configured it so the data collection occurs at 15 minutes past the hour:
- Open LoggerNet's Task Master, and press the Add Scheduled button to add a new scheduled task.
- On the How Task Starts tab, choose the Calendar option.
- Set the following options:
- Hours of the Day, select 8 through 17 (8:00 through 17:00 hours)
- Minutes of the Hour, select 15
- Days of Week, select 2 through 6 (Monday through Friday)
The screen should look similar to the following:
You can confirm that the schedule is set as you expect by selecting the View Schedule button:
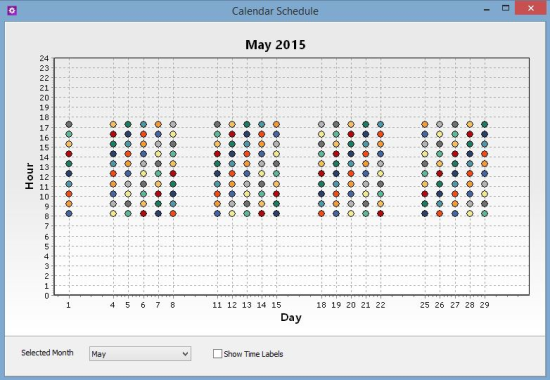
After confirming your schedule is set correctly, do the following:
- Switch to the What Task Does tab.
- Choose the Call Station tab.
- Select the Call Station checkbox.
- Select the name of the station to be called.
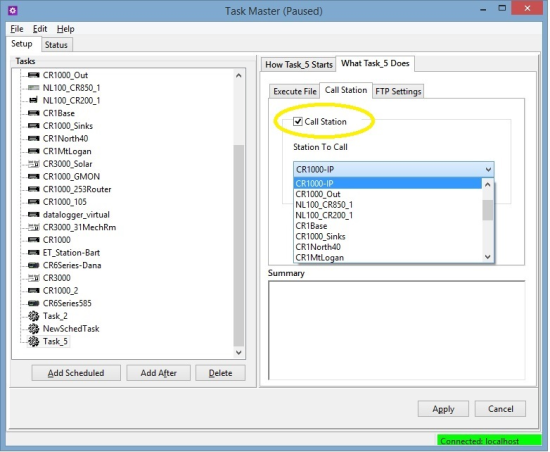
LoggerNet is now configured to call the station named CR1000-IP hourly between 8:15 a.m. and 5:15 p.m., Monday through Friday.
Tip: Keep in mind that any data collection set up from the Task Master will be performed in conjunction with scheduled data collection configured in the Setup window.
This fairly simple scenario shows how you can set up LoggerNet to accommodate a variety of data collection schedules.
Do you have a unique data collection setup? Leave a comment and tell us about it!


 Dana Worley, now retired, joined Campbell Scientific, Inc., in 1997. As an Application Engineer, Dana provided technical support and training to customers, and she developed online and written documentation. Other roles included management of R&D projects, software products, and a Software Test and Support group. Dana most recently managed our Technical Support Team in the Client Services department. She enjoys hiking, biking, traveling, and photography, and she is an accomplished artist, specializing in kiln-formed glass.
コメント
Please log in or register to comment.