Tips to Troubleshoot and Optimize Large RF Networks: Part 2
by Nathanael Wright | 更新日: 12/20/2023 | コメント: 1
In this blog article, I’ll share with you the next five tips (6 through 10) that you can use to help troubleshoot your radio frequency (RF) networks. This is the second article in our three-part series. If you missed my first article or want to review it again, please read Tips to Troubleshoot and Optimize Large RF Networks: Part 1.
Tip #6 - Use neighbor lists.
The best practice is to use neighbor lists instead of beaconing in most radios. Beaconing is a common form of initiating a hello exchange between PakBus devices. It establishes two devices as PakBus neighbors, enabling them to communicate with one another. A beacon happens at a specific time interval, such as every 60 seconds, to keep the communications path available between two neighbor devices. If every device that is connected to a radio is beaconing at the same time on a large radio network, it can create unnecessary congestion between devices. The best practice is to turn off beaconing for devices that don’t need it. If two devices are communicating with one another, only one needs to have a neighbor list or beacon for the other to communicate with it.
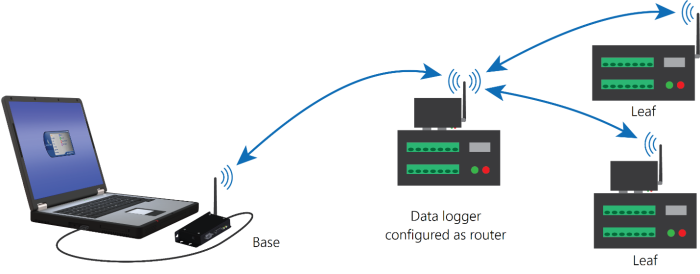
In practice, if each station can communicate directly with the base (centralized) station data logger, then only the base station data logger needs to beacon. In this situation, setting the beacon interval for the base station to one hour should be sufficient. If other leaf data loggers must communicate through another data logger to reach the base station, they should use a neighbor list to communicate with the data logger (neighbor) next to them instead of beaconing.
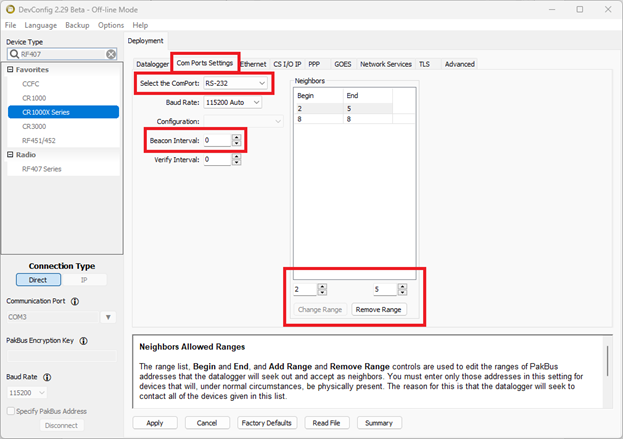
To turn the beacon setting off and use a neighbor list instead, use the Device Configuration Utility.
- Navigate to the Deployment tab > Com Ports Settings.
- Select the Com Port you wish to adjust the setting for and set the Beacon Interval value to 0.
Next, set up a neighbor list. The allowed neighbor list is set up on the same tab on the right.
- Enter the PakBus address range the data logger will communicate with.
- On the bottom left of the Neighbors section, enter the beginning of the range.
- On the right, enter the end of the PakBus address range.
- Click the Add Range button. Do not include the device’s own address in the range. If you need to leave one address out of your range, use two ranges such as 2 to 5 and 7 to 9. Only add the neighbor addresses that this device will communicate with through the specified interface (Com Port).
Tip #7 - Stagger the data collection.
When data collection for every station is scheduled to take place at the same time with large radio networks, bandwidth limitations could keep multiple stations from communicating simultaneously. To avoid this, stagger the data collection among stations.
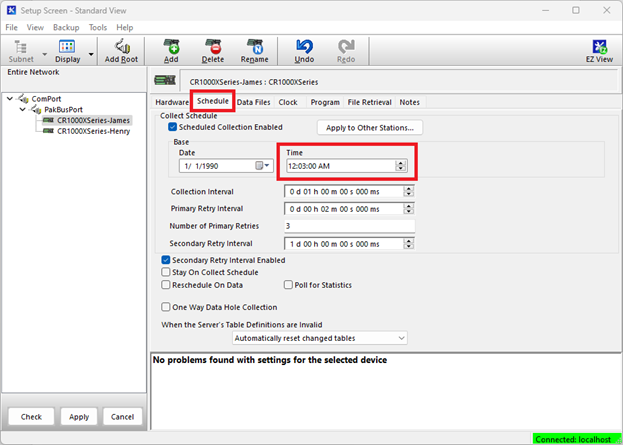
LoggerNet scheduled collection
Use the LoggerNet Setup > Schedule > Time field to stagger the data collection. For example, setting the Time to 12:03:00 AM will cause LoggerNet to initiate communications to this specific station three minutes after the hour. By setting the next data logger to six minutes after the hour, the two are likely to have successful data collection. The actual Time you use may be different. Ensure there is enough time to get through the entire network data collection schedule before the first station is contacted again.
Callback
Stagger callback times by using TimeIntoInterval() to trigger SendData() instructions. For more information, check out our How to Use Callback Capability So Your Data Logger Initiates Data Retrieval blog article.
Aggregate data
Another alternative is to aggregate data from all stations into one base data logger. Use GetVariables() or GetDataRecord() in the base data logger to pull values from each of the remote stations. Then use LoggerNet to collect data from the base data logger. This reduces radio network congestion because the base data logger instructions trigger one at a time. When the first instruction ends, the second begins, and so on. This reduces radio congestion because all the stations are not trying to send data at the same time.
Tip #8 - Reduce the PakBus packet size.
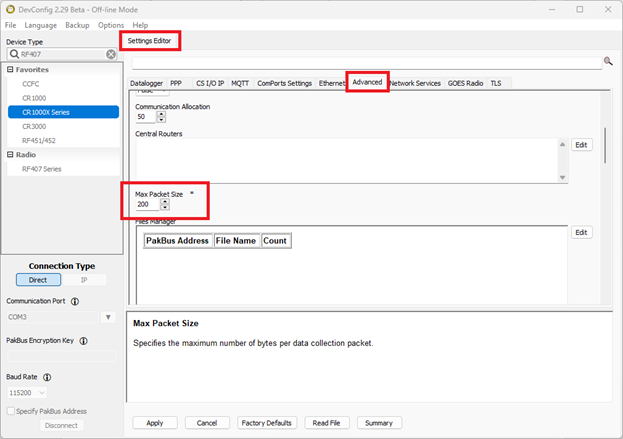
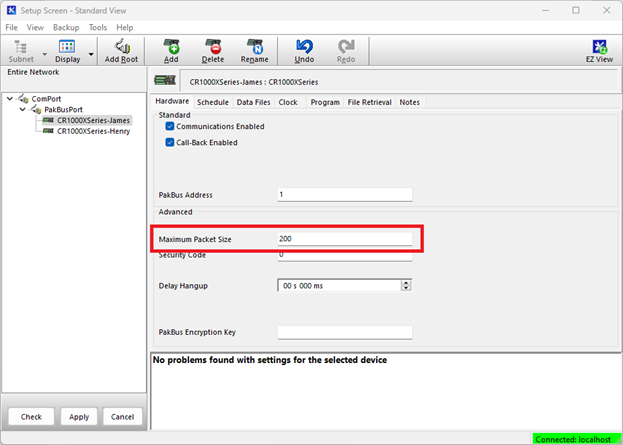
Reduce the data logger PakBus packet size to less than the radio packet size. PakBus packets larger than the radio packet size are split up, which creates more radio traffic and increases the number of packets that must be retransmitted if a packet is lost. The default RF407-series radio packet size is 256 bytes. Because the 256-byte packet needs to include space for packet header information—imagine putting an envelope inside another envelope to send—200 bytes is a safe size for the data logger PakBus packets that will go inside the radio packets. The default RF451/RF452 packet size is 234 bytes.
Use the Device Configuration Utility to change the PakBus packet size in your data logger. Change the Max Packet Size on the Settings Editor > Advanced tab.
To change the setting in LoggerNet, select your data logger on the Setup screen. On the Hardware tab, set the Maximum Packet Size to 200.
Tip #9 - Select the antenna.
Use directional (Yagi) antennas where possible. Generally, base stations use omni-directional antennas because they communicate with stations in multiple directions. Other stations that are only communicating with a base station or with a single neighbor can use directional antennas. Using a directional antenna has two advantages. First, the directional antenna power is focused, allowing it to go greater distances. Second, limiting the direction the antenna transmits helps reduce interference elsewhere.
Tip #10 - Use different network IDs.
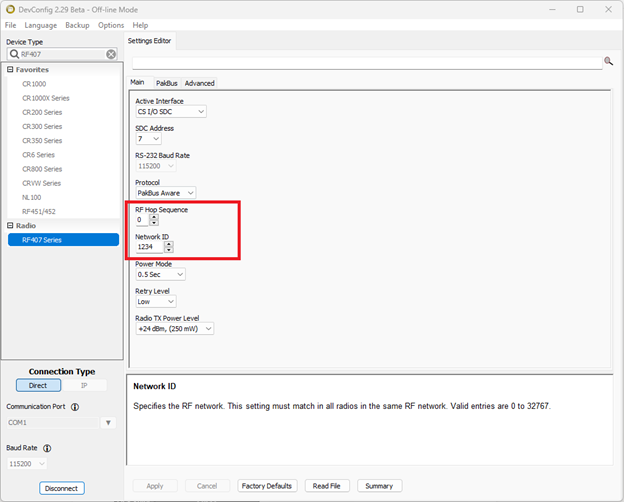
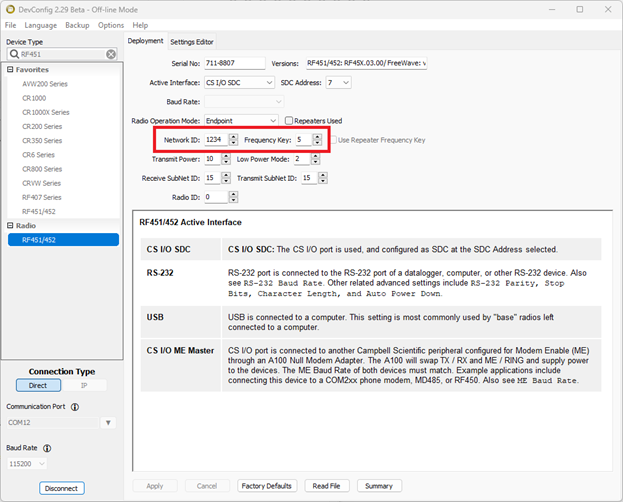
If another radio network of the same type is nearby (such as another RF407-series radio network), consider using different Radio Network IDs and RF Hop Sequences. This will prevent the two networks from joining and minimize interference. In RF451/452 radios, the RF Hop Sequence is called the Frequency Key.
For RF407-series radios, these settings are found on the Device Configuration Utility > Main tab.
For RF450/451/452 radios, these settings are found on the Device Configuration Utility > Deployment tab.
A final word
I hope you found these tips helpful. If you have any questions or comments, please post them below. Remember to look for the next blog article in this series for more tips to troubleshoot and optimize your large RF networks.


 Nathanael Wright is a Technical Support Engineer at Campbell Scientific, Inc. He provides technical support for data loggers, instruments, and communications equipment. Nathanael has a bachelor's degrees in Computer Information Science and Business Administration, and an MBA. In addition, Nathanael has more than 15 years of experience working in IP communications. Away from work, he enjoys breakdancing, hiking, writing, publishing books, and fiddling with computer equipment.
コメント
ariklee | 12/21/2023 at 11:25 PM
Great article! Will refer to it next time I'm troubleshooting.
For our larger networks, it is nice to visualize in Pakbus Graph. However, Pakbus Graph has been the same for a long time, almost like Campbell made the start of a great thing, then kind of forgot about it. I think it could be improved by:
1. Have abiilty to upload a background map in Pakbus Graph, perhaps like a link to Open Street Map?
2. Have the ability to lock the locations of the nodes on the map, and zoom in, zoom out, and pan around. Maybe the nodes have a lat/lon property in Setup?
3. Have the ability to resize the text boxes for nodes (smaller boxes for large networks).
4. In the future, you build your network IN Pakbus Graph, place the repeaters etc, and click a button to send the settings out the radios (dreaming here).
Please log in or register to comment.