概要
現在のバージョン: 3.1.3
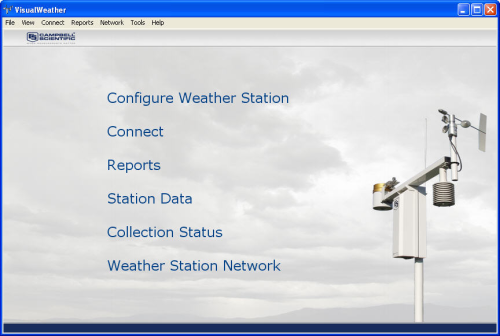
VisualWeather は、当社の気象ステーションのサポート ソフトウェアです。バージョン 3.0 以降では、カスタム気象ステーションまたは ET107、ET106、および MetData1 事前構成気象ステーションがサポートされます。このソフトウェアを使用すると、セットアップの初期化、ステーションの調査、データの表示、1 つ以上の気象ステーションからのレポートの生成を行うことができます。
続きを読む利点と特徴
- プログラミングの知識は必要ありません
- 気象ステーションの設定には数分しかかかりません
- 複数の気象ステーションをサポート
- データを手動で、またはスケジュールに従って収集できます
- LoggerNet を必要としないスタンドアロン ソフトウェア
イメージ


詳細
VisualWeather ソフトウェアは、プログラミングやデータベースの維持などの技術的な詳細を気にすることなく、信頼性の高いリアルタイムの気象データと印刷されたレポートを必要とするお客様向けです。これにより、事前構成済みまたはカスタムの Campbell Scientific ステーションを数分でセットアップできます。複数の気象ステーションがサポートされています。
VisualWeather の機能には、事前構成済みおよびカスタムの気象ステーションのプログラム生成、通信、およびレポート生成が含まれます。 VisualWeather は、ウィザードを使用して、気象ステーションのセンサの設定、通信リンクとデータロガー設定の構成、レポートの定義を段階的に実行します。この設定情報に基づいて、VisualWeather は気象ステーション (事前設定されたステーション用) のデータロガー プログラムを生成します。また、ショートカット (付属) を使用してカスタム気象ステーションをプログラミングすることもできます。
通信
サポートされている通信プロトコルには、直接接続、短距離モデム、電話モデム (TAPI を含む)、RF、電話から RF、TCP/IP などがあります。VisualWeather を使用して気象ステーションに接続している間、データロガー全体の状態 (バッテリ電圧、内部温度、エラーカウンタ)、気象ステーションの現在の状態、測定中の各センサの現在の測定値、およびメモリに保存されているデータテーブル (テーブルベースのデータロガーの場合) に関する測定値を表示できます。VisualWeather のレポート データベースのデータは、手動で収集することも、スケジュールに従って収集することもできます。
レポート生成
レポート生成では、測定中のセンサに基づいて、事前設定された間隔またはカスタム間隔で、さまざまな事前設定されたレポートが提供されます。また、蒸発散量、生育度日数などの計算値も多数用意されています。レポートは画面に表示され、ユーザーはそれを印刷したり、画像ファイルとして保存したりできます。データを ASCII ファイルにエクスポートしてさらに分析することもできます (Campbell Scientific のデータ形式に詳しい方のために説明すると、これは TOACI1 で、見出し情報を含むコンマ区切りのデータファイルです)。レポートのバッチ処理を使用して、レポートの生成を自動化できます。
システム要件
- PC にシリアル ポートまたは USB シリアル ポート アダプタが必要です
- PC に TCP/IP およびテレフォニー サービスをインストールして有効にする必要があります (詳細についてはマニュアルを参照してください)
使用許諾
このソフトウェアは、米国著作権法および国際著作権条約の規定によって保護されています。このソフトウェアをインストールすると、ライセンス契約の規定に従うことに同意したものとみなされます。この契約により、ユーザーは以下の条件に従ってソフトウェアを使用する非独占的ライセンスを付与されます:
- このソフトウェアを購入すると、1台の物理コンピュータまたは 1台の仮想マシンにのみ、ソフトウェアの 1つのインスタンスをインストールして使用できます。
- このソフトウェアは、配布目的または複数のオペレーターによるソフトウェアへのアクセスのためにネットワーク サーバーにロードすることはできません。ソフトウェアがインストールされているコンピュータ以外のコンピュータからソフトウェアを使用できる場合は、ソフトウェアにアクセスできる追加のコンピュータごとにソフトウェアのコピーのライセンスを取得する必要があります。
- このソフトウェアのコピーが以前のバージョンからのアップグレードである場合、以前のバージョンのソフトウェアの有効なライセンスを所有している必要があります。アップグレード コピーと以前のバージョンが同じコンピュータにインストールされて使用されている場合にのみ、以前のバージョンのソフトウェアのコピーを引き続き使用できます。以前のバージョンのソフトウェアを別のコンピュータにインストールして使用したり、別の当事者に譲渡したりすることはできません。
- このソフトウェア パッケージは、単一の製品としてライセンスされます。そのコンポーネント パーツを分離して複数のコンピュータで使用することはできません。
- 損傷や紛失に備えて、ソフトウェアへの投資を保護するために、元の配布と同様のメディアにこのソフトウェアのバックアップ コピーを 1つ作成することができます。このバックアップ コピーは、元のインストール メディアの使用できないコピーを置き換えるためにのみ使用できます。
このソフトウェアは、Campbell Scientific からの事前の書面による許可なしに、販売、他のソフトウェアへの組み込み、再配布、またはいかなる形での変更も行うことはできません。すべての著作権表示およびラベルはそのまま残す必要があります。
仕様
| 現在のバージョン | 3.1.3 |
互換性
注意: 以下は代表的な互換性情報を示しています。互換性のある製品や互換性のない製品をすべて網羅したリストではありません。
Data Loggers
| 製品 | 互換性 | 注意 |
|---|---|---|
| 21X (リタイア) | ||
| CR10 (リタイア) | ||
| CR1000 (リタイア) | ||
| CR1000X (リタイア) | ||
| CR10X (リタイア) | ||
| CR200X (リタイア) | ||
| CR206X (リタイア) | ||
| CR211X (リタイア) | ||
| CR216X (リタイア) | ||
| CR23X (リタイア) | ||
| CR295X (リタイア) | ||
| CR300 (リタイア) | ||
| CR3000 (リタイア) | ||
| CR310 | ||
| CR350 | ||
| CR500 (リタイア) | ||
| CR5000 (リタイア) | ||
| CR510 (リタイア) | ||
| CR6 | ||
| CR800 (リタイア) | ||
| CR850 (リタイア) | ||
| CR9000 (リタイア) | ||
| CR9000X (リタイア) |
互換性に関する追加情報
サポートされている気象ステーション
Visual Weather は、ET107、Toro T107、ET106、MetData1、またはカスタム Campbell Scientific ステーションをサポートしています。カスタム気象ステーションのサポートはバージョン 2 (2005 年 9 月リリース) で追加され、ET107 および Toro T107 のサポートはバージョン 3.0 (2009 年 4 月リリース) で追加されました。
ドキュメント
ダウンロード
VisualWeather Patch v.2.3 (26.3 MB) 19-12-2008
Upgrade Visual Weather version 2.0, 2.1 or 2.2 to 2.3.
This patch requires that version 2.0, 2.1 or 2.2 exists on the computer.
VisualWeather Patch v.3.1.3 (45.7 MB) 03-08-2012
Upgrade Visual Weather version 3.x to 3.1.3.
This patch requires that version 3.x exists on the computer.
VisualWeather Trial v.3.1.3 (56.1 MB) 03-08-2012
A fully functional 30 day trial version of VisualWeather.
VisualWeather is for those who want reliable, real-time weather data and printed reports without worrying about technical details.
よくある質問
VISUALWEATHERに関するよくある質問の数: 33
すべて展開すべて折りたたむ
-
ステーションが自動的にデータを収集するように設定されていることを確認します。
- VisualWeather のメイン画面から、「Collection Status」リンクを選択し、自動収集が設定されていることを確認します。
- Pause Scheduled Data Collection for All Stationsボックスがチェックされていないことを確認します。
データ収集を設定する必要がある場合は、VisualWeather のメイン画面にある Weather Station Network リンクを使用してステーションを編集します。
-
現時点ではできません。ただし、Boot Camp で XP を実行している OSX コンピュータや、仮想環境 (Parallels など) 内の他のコンピュータで Campbell Scientific ソフトウェアを使用しているという報告がお客様から寄せられています。
VisualWeather が特定の環境で動作するかどうかをテストするには、VisualWeather 製品ページのダウンロード セクションから 30 日間の試用版をダウンロードしてください。
-
詳細については、次の手順に従ってください。
- VisualWeather のメイン画面で、[Tools] メニューをクリックし、[Web Output Options...] を選択します。
- 画面下部の「Help」ボタンをクリックします。
- VisualWeather ヘルプの「Web Output Options」エントリが表示されます。
-
いいえ、ただし、この機能は VisualWeather 3.1.3 パッチのリリースで有効になりました。VisualWeather のソフトウェア パッチをダウンロードするには、VisualWeather 製品ページのダウンロード セクションにアクセスしてください。
-
注意: 新しいコンピュータに VisualWeather をインストールするには、キー コードが入った元の VisualWeather CD が必要です。
VisualWeather を移動するための推奨方法は、次の 4 つの手順です。
- 古いコンピュータ上の VisualWeather ネットワークをバックアップします。
- VisualWeather のメイン画面で、[Network] メニューをクリックし、[Backup/Restore Network...] を選択します。
- バックアップ/復元ウィンドウが表示されます。バックアップ ファイルのデフォルト名が [Backup File:] フィールドに表示されます。ファイル名または場所を変更するには、フィールドを編集するか、右側の参照ボタンをクリックして新しい場所を選択します。
- バックアップを作成するには、[Backup] ボタンをクリックします。VisualWeather は、データベースを含む現在の気象ステーションの設定をすべてバックアップします。バックアップ ファイルが作成されると、バックアップ ファイルの名前を示すメッセージが表示されます。
- バックアップ ファイルは非常に大きい場合があります。ファイルをフラッシュ ドライブにコピーするか、CD に書き込んで、新しいコンピュータに簡単にコピーできるようにします。
- オリジナルの CD とキー コードを使用して、新しいコンピュータに VisualWeather をインストールします。
- 新しいコンピューターに VisualWeather を復元します。
- VisualWeather.bkp ファイルを新しいコンピュータにコピーします。
- VisualWeather プログラムを実行します。メイン画面から、[Network] メニューをクリックし、[Backup/Restore Network...] を選択します。
- バックアップ/復元ウィンドウが開きます。バックアップ ファイルのデフォルト名が [Backup File:] フィールドに表示されます。ファイル名または場所を、古いコンピューターから移動したバックアップ ファイルと一致するように変更します。フィールドを編集するか、右側の参照ボタンをクリックしてバックアップ ファイルを参照して選択します。
- バックアップから復元するには、[Restore] ボタンをクリックします。VisualWeather はバックアップ ファイルからネットワークを復元します。復元が完了すると、ネットワークが読み込まれたことを示すメッセージが表示されます。
- VisualWeather を終了し、再起動してデータベースを初期化します。いくつかのレポートを実行して、データが完全であることを確認します。VisualWeather の新しいインストールで、古いコンピュータとは異なる COM ポート番号または異なるダイヤル文字列を使用する場合は、通信構成を編集する必要がある可能性があります。
- 古いコンピュータ上の VisualWeather ネットワークをバックアップします。
-
次の手順に従ってレポートを追加します。
- VisualWeather のメイン画面で、[Reports] メニューをクリックし、[Batch Reports...] を選択します。
- バッチレポートスケジュール画面で、「New…」ボタンをクリックします。
- バッチレポート選択画面で、気象観測所を選択します。
- Report Typeのオプションを選択します。
- 「Generate According To Schedule」オプションを選択します。
- 「Interval」フィールドで、1 時間などの間隔を設定します。
- 画面の右側では、ステーションから利用可能なデータに基づいてチェックボックスが選択されています。チェックボックスをオンにしてレポートを選択またはクリアします。
- [Output As:] セクションで、[Web] ボックスをオンにします。
- 「Create Batch」ボタンをクリックします。
- バッチの名前を入力します。
バッチが実行されると、Web フォルダにファイルが作成され、FTP 経由で Web サイトに自動的に転送され、Web ページに自動的に追加されます。これらのファイルは、左上隅の気象観測所名をクリックした後に表示されるドロップダウン レポートに追加オプションとしてリストされます。
-
完全に機能する 30 日間の試用版を入手する方法は、現在 Campbell Scientific のユーザーである場合と、そうではない場合とでは若干異なります。両方の方法について以下に説明します。
現在 Campbell Scientific のユーザーの場合は、次の手順に従ってください。
- まだログインしていない場合は、Campbell Scientific カスタマー センターにログインしてください。
- VisualWeather のダウンロード リストがまだ表示されていない場合は、VisualWeather 製品ページのダウンロード セクションに移動します。
- ダウンロードを開始するには、タイトルの右側にある「今すぐダウンロード」リンクをクリックします。
- 覚えやすい場所にファイルを保存します。
- ダウンロードが完了したら、インストール ファイルが保存されている選択した場所を参照します。
- ファイルをダブルクリックしてインストールを実行します。
- 画面の指示に従ってインストールを完了します。
Campbell Scientific のユーザーでない方は、次の手順に従ってください。
- VisualWeather のダウンロード リストがまだ表示されていない場合は、VisualWeather 製品ページのダウンロード セクションに移動します。
- タイトルの右側にある「リストに追加」リンクをクリックします。
- 新しい画面が開きます。連絡先情報セクションのフィールドに入力し、[送信] をクリックします。注意: このプロセスには義務は発生せず、この情報は第三者と共有または販売されることはありません。
- ダウンロードへのリンク、ログイン ユーザー名、パスワードを含む自動メール メッセージが、ユーザーが指定したメール アドレスに送信されます。これらの資格情報は 5 日間有効です。
- メール メッセージのダウンロード リンクをクリックします。
- メール メッセージに記載されているユーザー名とパスワードを入力するか、コピーして貼り付けます。
- ログインすると、ダウンロード プロセスが自動的に開始されます。
- 覚えやすい場所にファイルを保存します。
- ダウンロードが完了したら、インストール ファイルが保存されている選択した場所を参照します。
- ファイルをダブルクリックしてインストールを実行します。
- 画面の指示に従ってインストールを完了します。
-
VisualWeather のパッチが利用可能な場合は、VisualWeather 製品ページのダウンロード セクションにリストされます。
注意: オンライン アカウントをお持ちでないお客様は、ファイルをダウンロードするために連絡先情報を入力するよう求められます。このプロセスには義務は発生せず、この情報は第三者に共有または販売されることはありません。
パッチをインストールするには、次の手順に従います。
- まだログインしていない場合は、Campbell Scientific カスタマー センターにログインしてください。
- VisualWeather のダウンロード リストがまだ表示されていない場合は、VisualWeather 製品ページのダウンロード セクションに移動します。
- パッチ名の右側にある [今すぐダウンロード] リンクをクリックします。
- 覚えやすい場所にファイルを保存します。
- ダウンロードが完了したら、パッチが保存された選択した場所を参照します。
- ファイルをダブルクリックしてパッチをインストールします。
- 画面の指示に従ってインストールを完了します。
-
いいえ。Web 出力用に作成された XML ファイルの内容は下位互換性のためだけに存在し、ユーザーが制御することはできません。
-
VisualWeather でステーションを作成すると、VisualWeather が認識しているステーションが選択される、または作成されたカスタム ステーションが VisualWeather に通知されます。このプロセスには、ステーションで収集されるデータを VisualWeather に通知することが含まれます。
VisualWeather は、ステーション情報に基づいて、ステーションからのデータを、そのデータを表示できるコントロールにマップします。このデータは、ステーション データが次のいずれかの方法で表示されたときに表示されます。
- ステーションに接続して現在の状況を確認する(アクティブモニタリング)
- メイン画面のステーションデータリンクをクリックする(パッシブモニタリング)
記事とプレスリリース
以下に記載
Privacy Policy Update
We've updated our privacy policy. 詳細はこちら
Cookie Consent
Update your cookie preferences. クッキーの設定を更新する


